Deploying to AWS with Fargate, Vapor, and MongoDB Atlas
This guide illustrates how to deploy a Server-Side Swift workload on AWS. The workload is a REST API for tracking a To Do List. It uses the Vapor framework to program the API methods. The methods store and retrieve data in a MongoDB Atlas cloud database. The Vapor application is containerized and deployed to AWS on AWS Fargate using the AWS Copilot toolkit.
Architecture
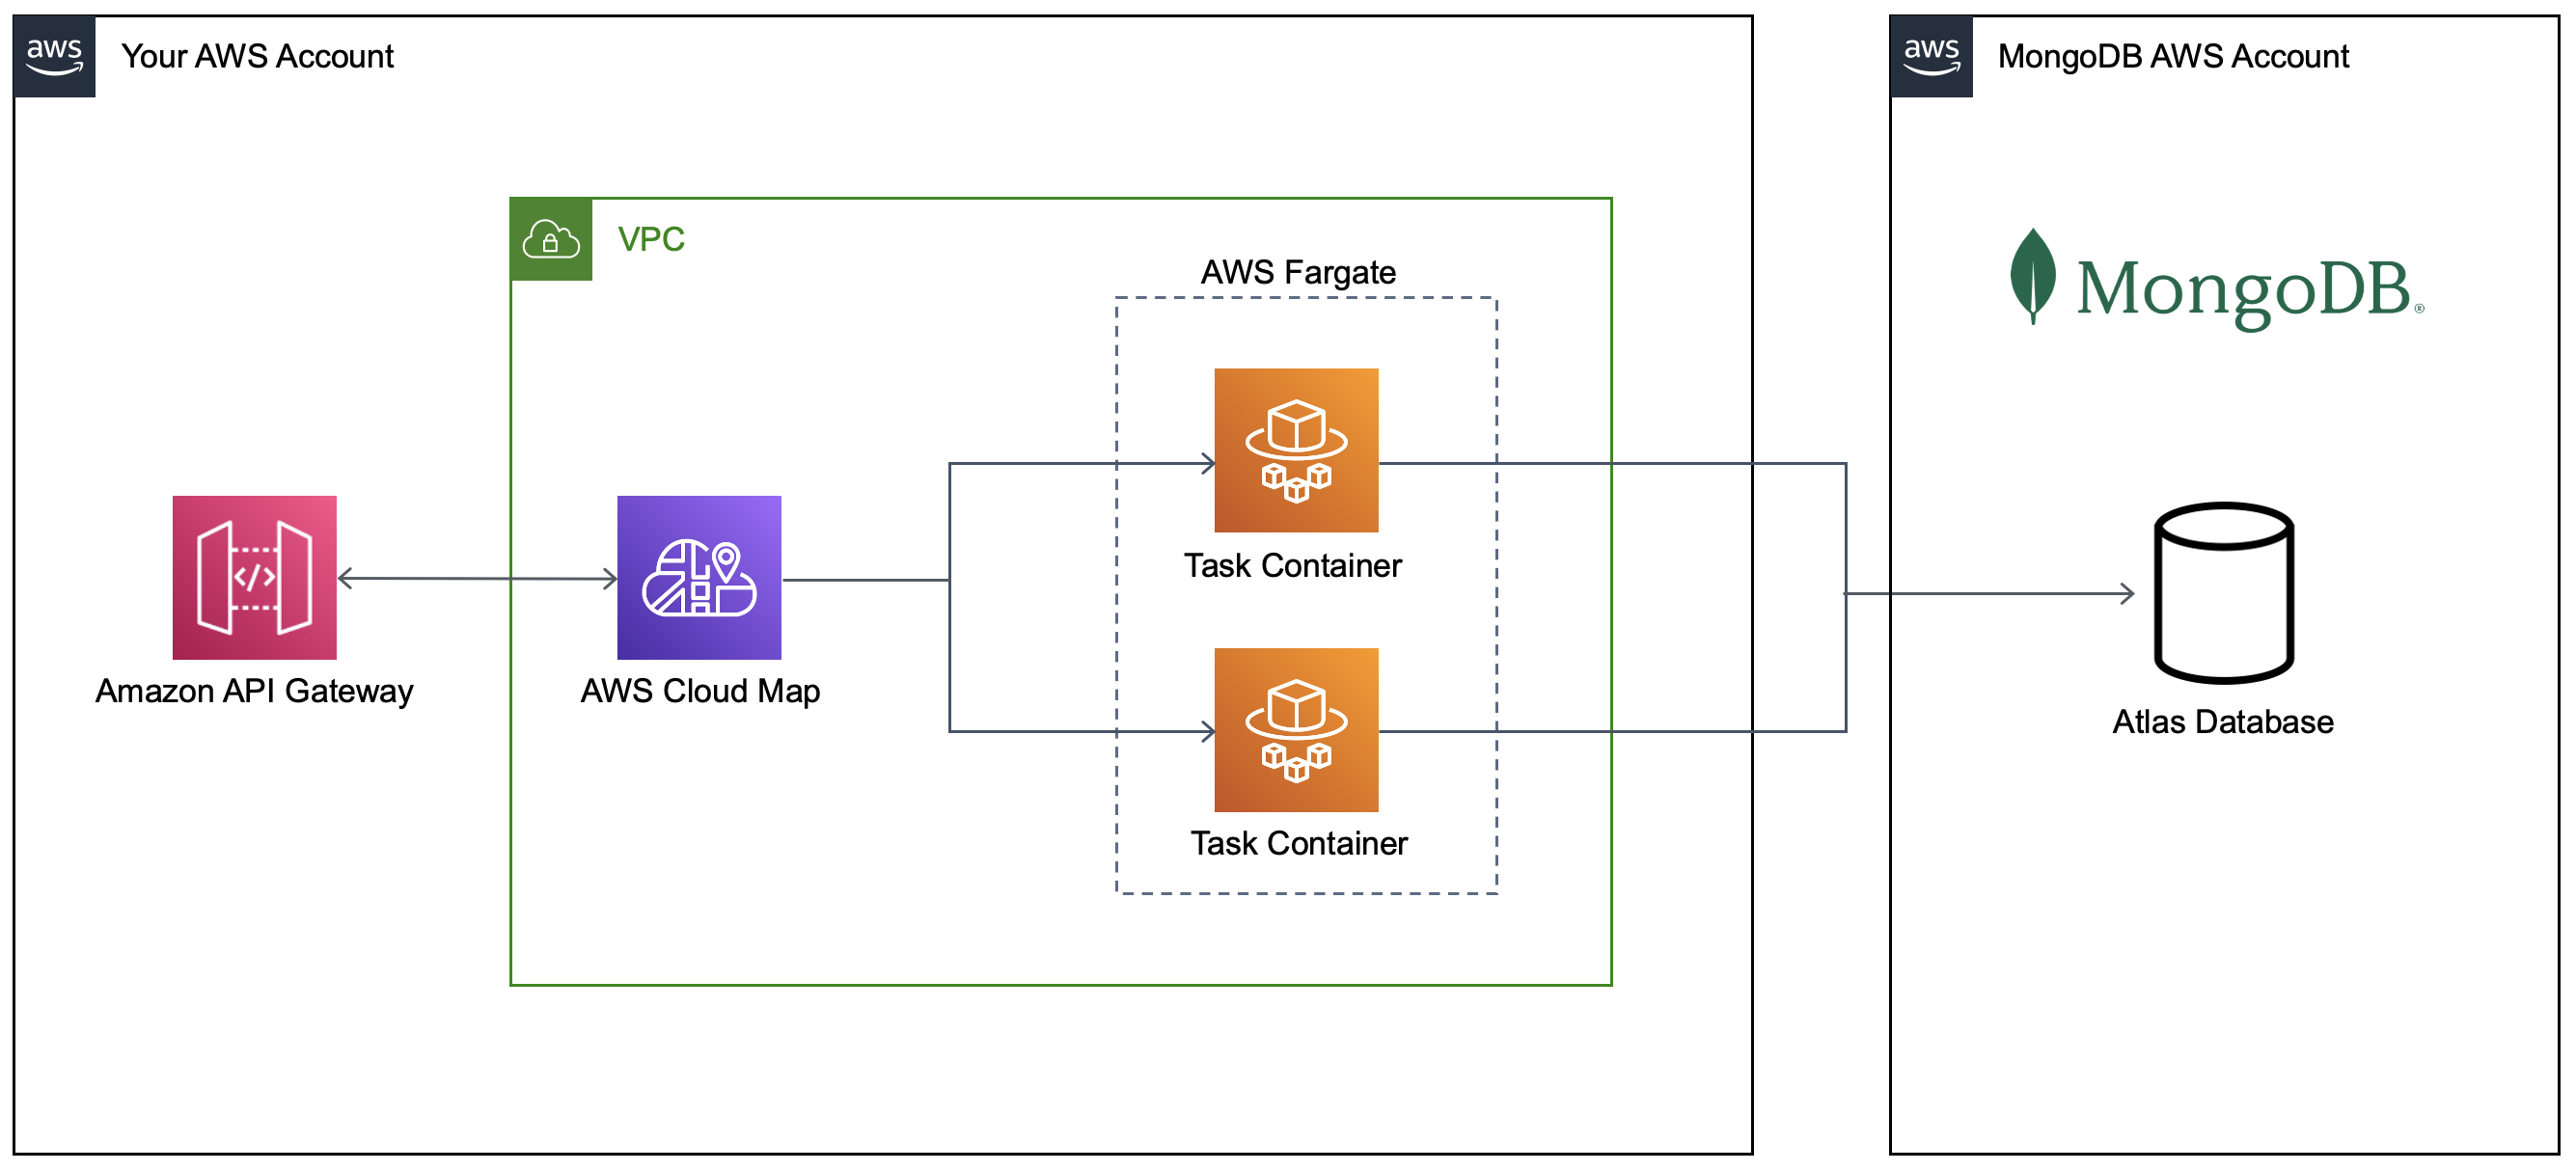
- Amazon API Gateway receives API requests
- API Gateway locates your application containers in AWS Fargate through internal DNS managed by AWS Cloud Map
- API Gateway forwards the requests to the containers
- The containers run the Vapor framework and have methods to GET and POST items
- Vapor stores and retrieves items in a MongoDB Atlas cloud database which runs in a MongoDB managed AWS account
Prerequisites
To build this sample application, you need:
- AWS Account
- MongoDB Atlas Database
- AWS Copilot - a command-line tool used to create containerized workloads on AWS
- Docker Desktop - to compile your Swift code into a Docker image
- Vapor - to code the REST service
- AWS Command Line Interface (AWS CLI) - install the CLI and configure it with credentials to your AWS account
Step 1: Create Your Database
If you are new to MongoDB Atlas, follow this Getting Started Guide. You need to create the following items:
- Atlas Account
- Cluster
- Database Username / Password
- Database
- Collection
In subsequent steps, you provide values to these items to configure the application.
Step 2: Initialize a New Vapor Project
Create a folder for your project.
mkdir todo-app && cd todo-app
Initialize a Vapor project named api.
vapor new api -n
Step 3: Add Project Dependencies
Vapor initializes a Package.swift file for the project dependencies. Your project requires an additional library, MongoDBVapor. Add the MongoDBVapor library to the project and target dependencies of your Package.swift file.
Your updated file should look like this:
api/Package.swift
// swift-tools-version:5.6
import PackageDescription

let package = Package(
    name: "api",
    platforms: [
       .macOS(.v12)
    ],
    dependencies: [
        .package(url: "https://github.com/vapor/vapor", .upToNextMajor(from: "4.7.0")),
        .package(url: "https://github.com/mongodb/mongodb-vapor", .upToNextMajor(from: "1.1.0"))
    ],
    targets: [
        .target(
            name: "App",
            dependencies: [
                .product(name: "Vapor", package: "vapor"),
                .product(name: "MongoDBVapor", package: "mongodb-vapor")
            ],
            swiftSettings: [
                .unsafeFlags(["-cross-module-optimization"], .when(configuration: .release))
            ]
        ),
        .executableTarget(name: "Run", dependencies: [.target(name: "App")]),
        .testTarget(name: "AppTests", dependencies: [
            .target(name: "App"),
            .product(name: "XCTVapor", package: "vapor"),
        ])
    ]
)
Step 4: Update the Dockerfile
You deploy your Swift Server code to AWS Fargate as a Docker image. Vapor generates an initial Dockerfile for your application. Your application requires a few modifications to this Dockerfile:
- pull the build and run images from the Amazon ECR Public Gallery container repository
- install libssl-dev in the build image
- install libxml2 and curl in the run image
Replace the contents of the Vapor generated Dockerfile with the following code:
api/Dockerfile
# ================================
# Build image
# ================================
FROM public.ecr.aws/docker/library/swift:5.6.2-focal as build

# Install OS updates
RUN export DEBIAN_FRONTEND=noninteractive DEBCONF_NONINTERACTIVE_SEEN=true \
    && apt-get -q update \
    && apt-get -q dist-upgrade -y \
    && apt-get -y install libssl-dev \
    && rm -rf /var/lib/apt/lists/*

# Set up a build area
WORKDIR /build

# First just resolve dependencies.
# This creates a cached layer that can be reused
# as long as your Package.swift/Package.resolved
# files do not change.
COPY ./Package.* ./
RUN swift package resolve

# Copy entire repo into container
COPY . .

# Build everything, with optimizations
RUN swift build -c release --static-swift-stdlib

# Switch to the staging area
WORKDIR /staging

# Copy main executable to staging area
RUN cp "$(swift build --package-path /build -c release --show-bin-path)/Run" ./

# Copy resources bundled by SwiftPM to staging area
RUN find -L "$(swift build --package-path /build -c release --show-bin-path)/" -regex '.*\.resources$' -exec cp -Ra {} ./ \;

# Copy any resources from the public directory and views directory if the directories exist
# Ensure that by default, neither the directory nor any of its contents are writable.
RUN [ -d /build/Public ] && { mv /build/Public ./Public && chmod -R a-w ./Public; } || true
RUN [ -d /build/Resources ] && { mv /build/Resources ./Resources && chmod -R a-w ./Resources; } || true

# ================================
# Run image
# ================================
FROM public.ecr.aws/ubuntu/ubuntu:focal

# Make sure all system packages are up to date, and install only essential packages.
RUN export DEBIAN_FRONTEND=noninteractive DEBCONF_NONINTERACTIVE_SEEN=true \
    && apt-get -q update \
    && apt-get -q dist-upgrade -y \
    && apt-get -q install -y \
      ca-certificates \
      tzdata \
      curl \
      libxml2 \
    && rm -r /var/lib/apt/lists/*

# Create a vapor user and group with /app as its home directory
RUN useradd --user-group --create-home --system --skel /dev/null --home-dir /app vapor

# Switch to the new home directory
WORKDIR /app

# Copy built executable and any staged resources from builder
COPY --from=build --chown=vapor:vapor /staging /app

# Ensure all further commands run as the vapor user
USER vapor:vapor

# Let Docker bind to port 8080
EXPOSE 8080

# Start the Vapor service when the image is run, default to listening on 8080 in production environment
ENTRYPOINT ["./Run"]
CMD ["serve", "--env", "production", "--hostname", "0.0.0.0", "--port", "8080"]
Step 5: Update the Vapor Source Code
Vapor also generates the sample files needed to code an API. You must customize these files with code that exposes your To Do List API methods and interacts with your MongoDB database.
The configure.swift file initializes an application-wide pool of connections to your MongoDB database. It retrieves the connection string to your MongoDB database from an environment variable at runtime.
Replace the contents of the file with the following code:
api/Sources/App/configure.swift
import MongoDBVapor
import Vapor

public func configure(_ app: Application) throws {

    let MONGODB_URI = Environment.get("MONGODB_URI") ?? ""

    try app.mongoDB.configure(MONGODB_URI)

    ContentConfiguration.global.use(encoder: ExtendedJSONEncoder(), for: .json)
    ContentConfiguration.global.use(decoder: ExtendedJSONDecoder(), for: .json)

    try routes(app)
}
The routes.swift file defines the methods to your API. These include a POST Item method to insert a new item and a GET Items method to retrieve a list of all existing items. See comments in the code to understand what happens in each section.
Replace the contents of the file with the following code:
api/Sources/App/routes.swift
import Vapor
import MongoDBVapor

// define the structure of a ToDoItem
struct ToDoItem: Content {
    var _id: BSONObjectID?
    let name: String
    var createdOn: Date?
}

// import the MongoDB database and collection names from environment variables
let MONGODB_DATABASE = Environment.get("MONGODB_DATABASE") ?? ""
let MONGODB_COLLECTION = Environment.get("MONGODB_COLLECTION") ?? ""

// define an extension to the Vapor Request object to interact with the database and collection
extension Request {

    var todoCollection: MongoCollection<ToDoItem> {
        self.application.mongoDB.client.db(MONGODB_DATABASE).collection(MONGODB_COLLECTION, withType: ToDoItem.self)
    }
}

// define the api routes
func routes(_ app: Application) throws {

    // an base level route used for container healthchecks
    app.get { req in
        return "OK"
    }

    // GET items returns a JSON array of all items in the database
    app.get("items") { req async throws -> [ToDoItem] in
        try await req.todoCollection.find().toArray()
    }

    // POST item inserts a new item into the database and returns the item as JSON
    app.post("item") { req async throws -> ToDoItem in

        var item = try req.content.decode(ToDoItem.self)
        item.createdOn = Date()

        let response = try await req.todoCollection.insertOne(item)
        item._id = response?.insertedID.objectIDValue

        return item
    }
}
The main.swift file defines the startup and shutdown code for the application. Change the code to include a defer statement to close the connection to your MongoDB database when the application ends.
Replace the contents of the file with the following code:
api/Sources/Run/main.swift
import App
import Vapor
import MongoDBVapor

var env = try Environment.detect()
try LoggingSystem.bootstrap(from: &env)
let app = Application(env)
try configure(app)

// shutdown and cleanup the MongoDB connection when the application terminates
defer {
  app.mongoDB.cleanup()
  cleanupMongoSwift()
  app.shutdown()
}

try app.run()
Step 6: Initialize AWS Copilot
AWS Copilot is a command-line utility for generating a containerized application in AWS. You use Copilot to build and deploy your Vapor code as containers in Fargate. Copilot also creates and tracks an AWS Systems Manager secret parameter for the value of your MongoDB connection string. You store this value as a secret as it contains the username and password to your database. You never want to store this in your source code. Finally, Copilot creates an API Gateway to expose a public endpoint for your API.
Initialize a new Copilot application.
copilot app init todo
Add a new Copilot Backend Service. The service refers to the Dockerfile of your Vapor project for instructions on how to build the container.
copilot svc init --name api --svc-type "Backend Service" --dockerfile ./api/Dockerfile
Create a Copilot environment for your application. An environment typically aligns to a phase, such as dev, test, or prod. When prompted, select the AWS credentials profile you configured with the AWS CLI.
copilot env init --name dev --app todo --default-config
Deploy the dev environment:
copilot env deploy --name dev
Step 7: Create a Copilot Secret for Database Credentials
Your application requires credentials to authenticate to your MongoDB Atlas database. You should never store this sensitive information in your source code. Create a Copilot secret to store the credentials. This stores the connection string to your MongoDB cluster in an AWS Systems Manager Secret Parameter.
Determine the connection string from the MongoDB Atlas website. Select the Connect button on your cluster page and the Connect your application.
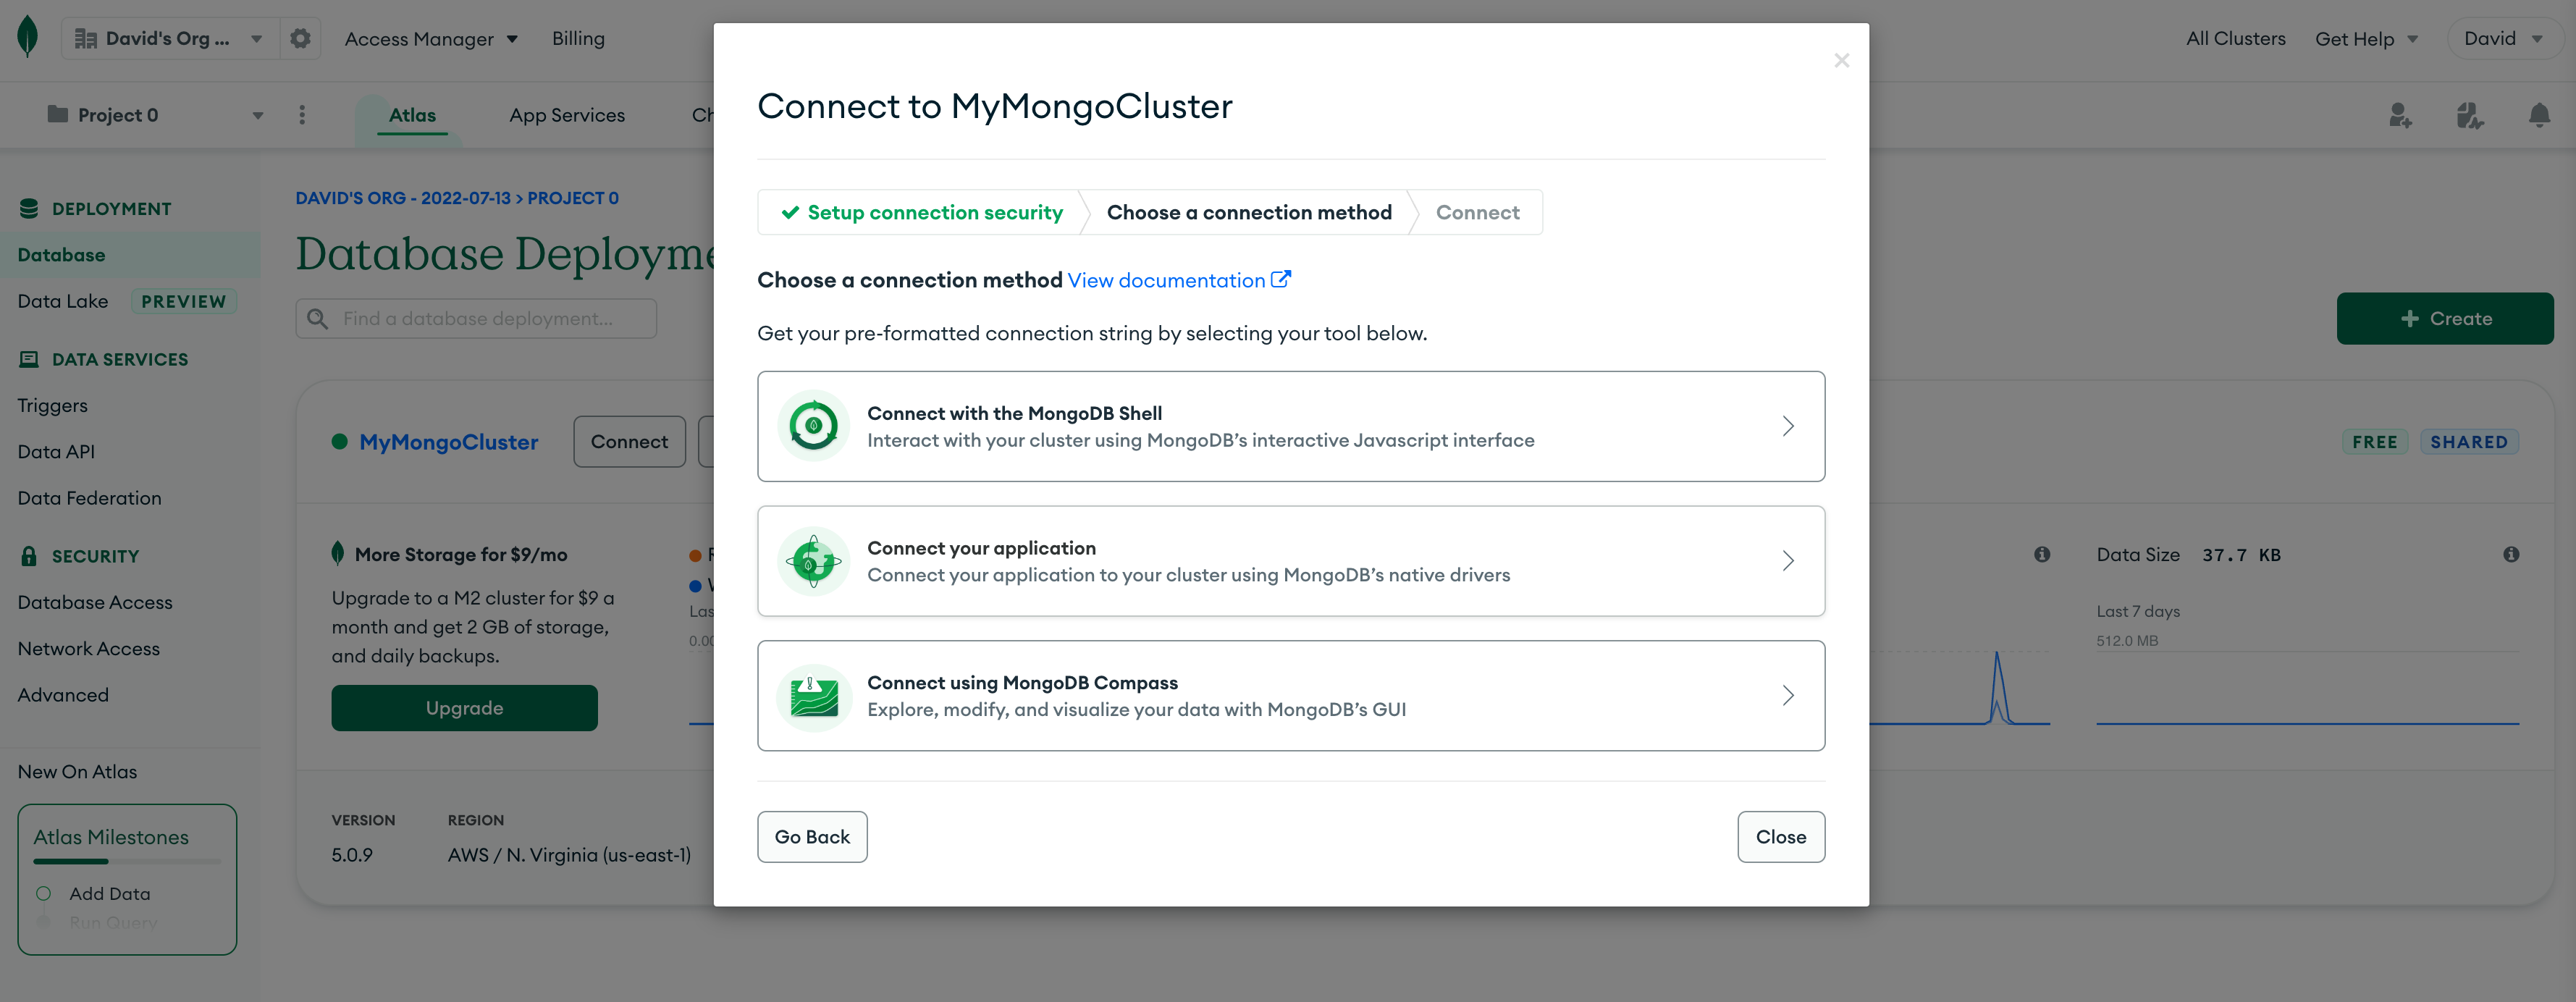
Select Swift version 1.2.0 as the Driver and copy the displayed connection string. It looks something like this:
mongodb+srv://username:<password>@mycluster.mongodb.net/?retryWrites=true&w=majority
The connection string contains your database username and a placeholder for the password. Replace the <password> section with your database password. Then create a new Copilot secret named MONGODB_URI and save your connection string when prompted for the value.
copilot secret init --app todo --name MONGODB_URI
Fargate injects the secret value as an environment variable into your container at runtime. In Step 5 above, you extracted this value in your api/Sources/App/configure.swift file and used it to configure your MongoDB connection.
Step 8: Configure the Backend Service
Copilot generates a manifest.yml file for your application that defines the attributes of your service, such as the Docker image, network, secrets, and environment variables. Change the manifest file generated by Copilot to add the following properties:
- configure a health check for the container image
- add a reference to the MONGODB_URI secret
- configure the service network as private
- add environment variables for the MONGODB_DATABASE and MONGODB_COLLECTION
To implement these changes, replace the contents of the manifest.yml file with the following code. Update the values of MONGODB_DATABASE and MONGODB_COLLECTION to reflect the names of the database and cluster you created in MongoDB Atlas for this application.
If you are building this solution on a Mac M1/M2 machine, uncomment the platform property in the manifest.yml file to specify an ARM build. The default value is linux/x86_64.
copilot/api/manifest.yml
# The manifest for the "api" service.
# Read the full specification for the "Backend Service" type at:
#  https://aws.github.io/copilot-cli/docs/manifest/backend-service/

# Your service name will be used in naming your resources like log groups, ECS services, etc.
name: api
type: Backend Service

# Your service is reachable at "http://api.${COPILOT_SERVICE_DISCOVERY_ENDPOINT}:8080" but is not public.

# Configuration for your containers and service.
image:
  # Docker build arguments. For additional overrides: https://aws.github.io/copilot-cli/docs/manifest/backend-service/#image-build
  build: api/Dockerfile
  # Port exposed through your container to route traffic to it.
  port: 8080
  healthcheck:
    command: ["CMD-SHELL", "curl -f http://localhost:8080 || exit 1"]
    interval: 10s
    retries: 2
    timeout: 5s
    start_period: 0s

# Mac M1/M2 users - uncomment the following platform line
# the default platform is linux/x86_64

# platform: linux/arm64

cpu: 256       # Number of CPU units for the task.
memory: 512    # Amount of memory in MiB used by the task.
count: 2       # Number of tasks that should be running in your service.
exec: true     # Enable running commands in your container.

# define the network as private. this will place Fargate in private subnets
network:
  vpc:
    placement: private

# Optional fields for more advanced use-cases.
#
# Pass environment variables as key value pairs.
variables:
 MONGODB_DATABASE: home
 MONGODB_COLLECTION: todolist

# Pass secrets from AWS Systems Manager (SSM) Parameter Store.
secrets:
 MONGODB_URI: /copilot/${COPILOT_APPLICATION_NAME}/${COPILOT_ENVIRONMENT_NAME}/secrets/MONGODB_URI

# You can override any of the values defined above by environment.
#environments:
#  test:
#    count: 2               # Number of tasks to run for the "test" environment.
#    deployment:            # The deployment strategy for the "test" environment.
#       rolling: 'recreate' # Stops existing tasks before new ones are started for faster deployments.
Step 9: Create a Copilot Addon Service for your API Gateway
Copilot does not have the capability to add an API Gateway to your application. You can, however, add additional AWS resources to your application using Copilot “Addons”.
Define an addon by creating an addons folder under your Copilot service folder and creating a CloudFormation yaml template to define the services you wish to create.
Create a folder for the addon:
mkdir -p copilot/api/addons
Create a file to define the API Gateway:
touch copilot/api/addons/apigateway.yml
Create a file to pass parameters from the main service into the addon service:
touch copilot/api/addons/addons.parameters.yml
Copy the following code into the addons.parameters.yml file. It passes the ID of the Cloud Map service into the addon stack.
copilot/api/addons/addons.parameters.yml
Parameters:
   DiscoveryServiceARN:  !GetAtt DiscoveryService.Arn
Copy the following code into the addons/apigateway.yml file. It creates an API Gateway using the DiscoveryServiceARN to integrate with the Cloud Map service Copilot created for your Fargate containers.
copilot/api/addons/apigateway.yml
Parameters:
  App:
    Type: String
    Description: Your application's name.
  Env:
    Type: String
    Description: The environment name your service, job, or workflow is being deployed to.
  Name:
    Type: String
    Description: The name of the service, job, or workflow being deployed.
  DiscoveryServiceARN:
    Type: String
    Description: The ARN of the Cloud Map discovery service.

Resources:
  ApiVpcLink:
    Type: AWS::ApiGatewayV2::VpcLink
    Properties:
      Name: !Sub "${App}-${Env}-${Name}"
      SubnetIds:
        !Split [",", Fn::ImportValue: !Sub "${App}-${Env}-PrivateSubnets"]
      SecurityGroupIds:
        - Fn::ImportValue: !Sub "${App}-${Env}-EnvironmentSecurityGroup"

  ApiGatewayV2Api:
    Type: "AWS::ApiGatewayV2::Api"
    Properties:
      Name: !Sub "${Name}.${Env}.${App}.api"
      ProtocolType: "HTTP"
      CorsConfiguration:
        AllowHeaders:
          - "*"
        AllowMethods:
          - "*"
        AllowOrigins:
          - "*"

  ApiGatewayV2Stage:
    Type: "AWS::ApiGatewayV2::Stage"
    Properties:
      StageName: "$default"
      ApiId: !Ref ApiGatewayV2Api
      AutoDeploy: true

  ApiGatewayV2Integration:
    Type: "AWS::ApiGatewayV2::Integration"
    Properties:
      ApiId: !Ref ApiGatewayV2Api
      ConnectionId: !Ref ApiVpcLink
      ConnectionType: "VPC_LINK"
      IntegrationMethod: "ANY"
      IntegrationType: "HTTP_PROXY"
      IntegrationUri: !Sub "${DiscoveryServiceARN}"
      TimeoutInMillis: 30000
      PayloadFormatVersion: "1.0"

  ApiGatewayV2Route:
    Type: "AWS::ApiGatewayV2::Route"
    Properties:
      ApiId: !Ref ApiGatewayV2Api
      RouteKey: "$default"
      Target: !Sub "integrations/${ApiGatewayV2Integration}"
Step 10: Deploy the Copilot Service
When deploying your service, Copilot executes the following actions:
- builds your Vapor Docker image
- deploys the image to the Amazon Elastic Container Registry (ECR) in your AWS account
- creates and deploys an AWS CloudFormation template into your AWS account. CloudFormation creates all the services defined in your application.
copilot svc deploy --name api --app todo --env dev
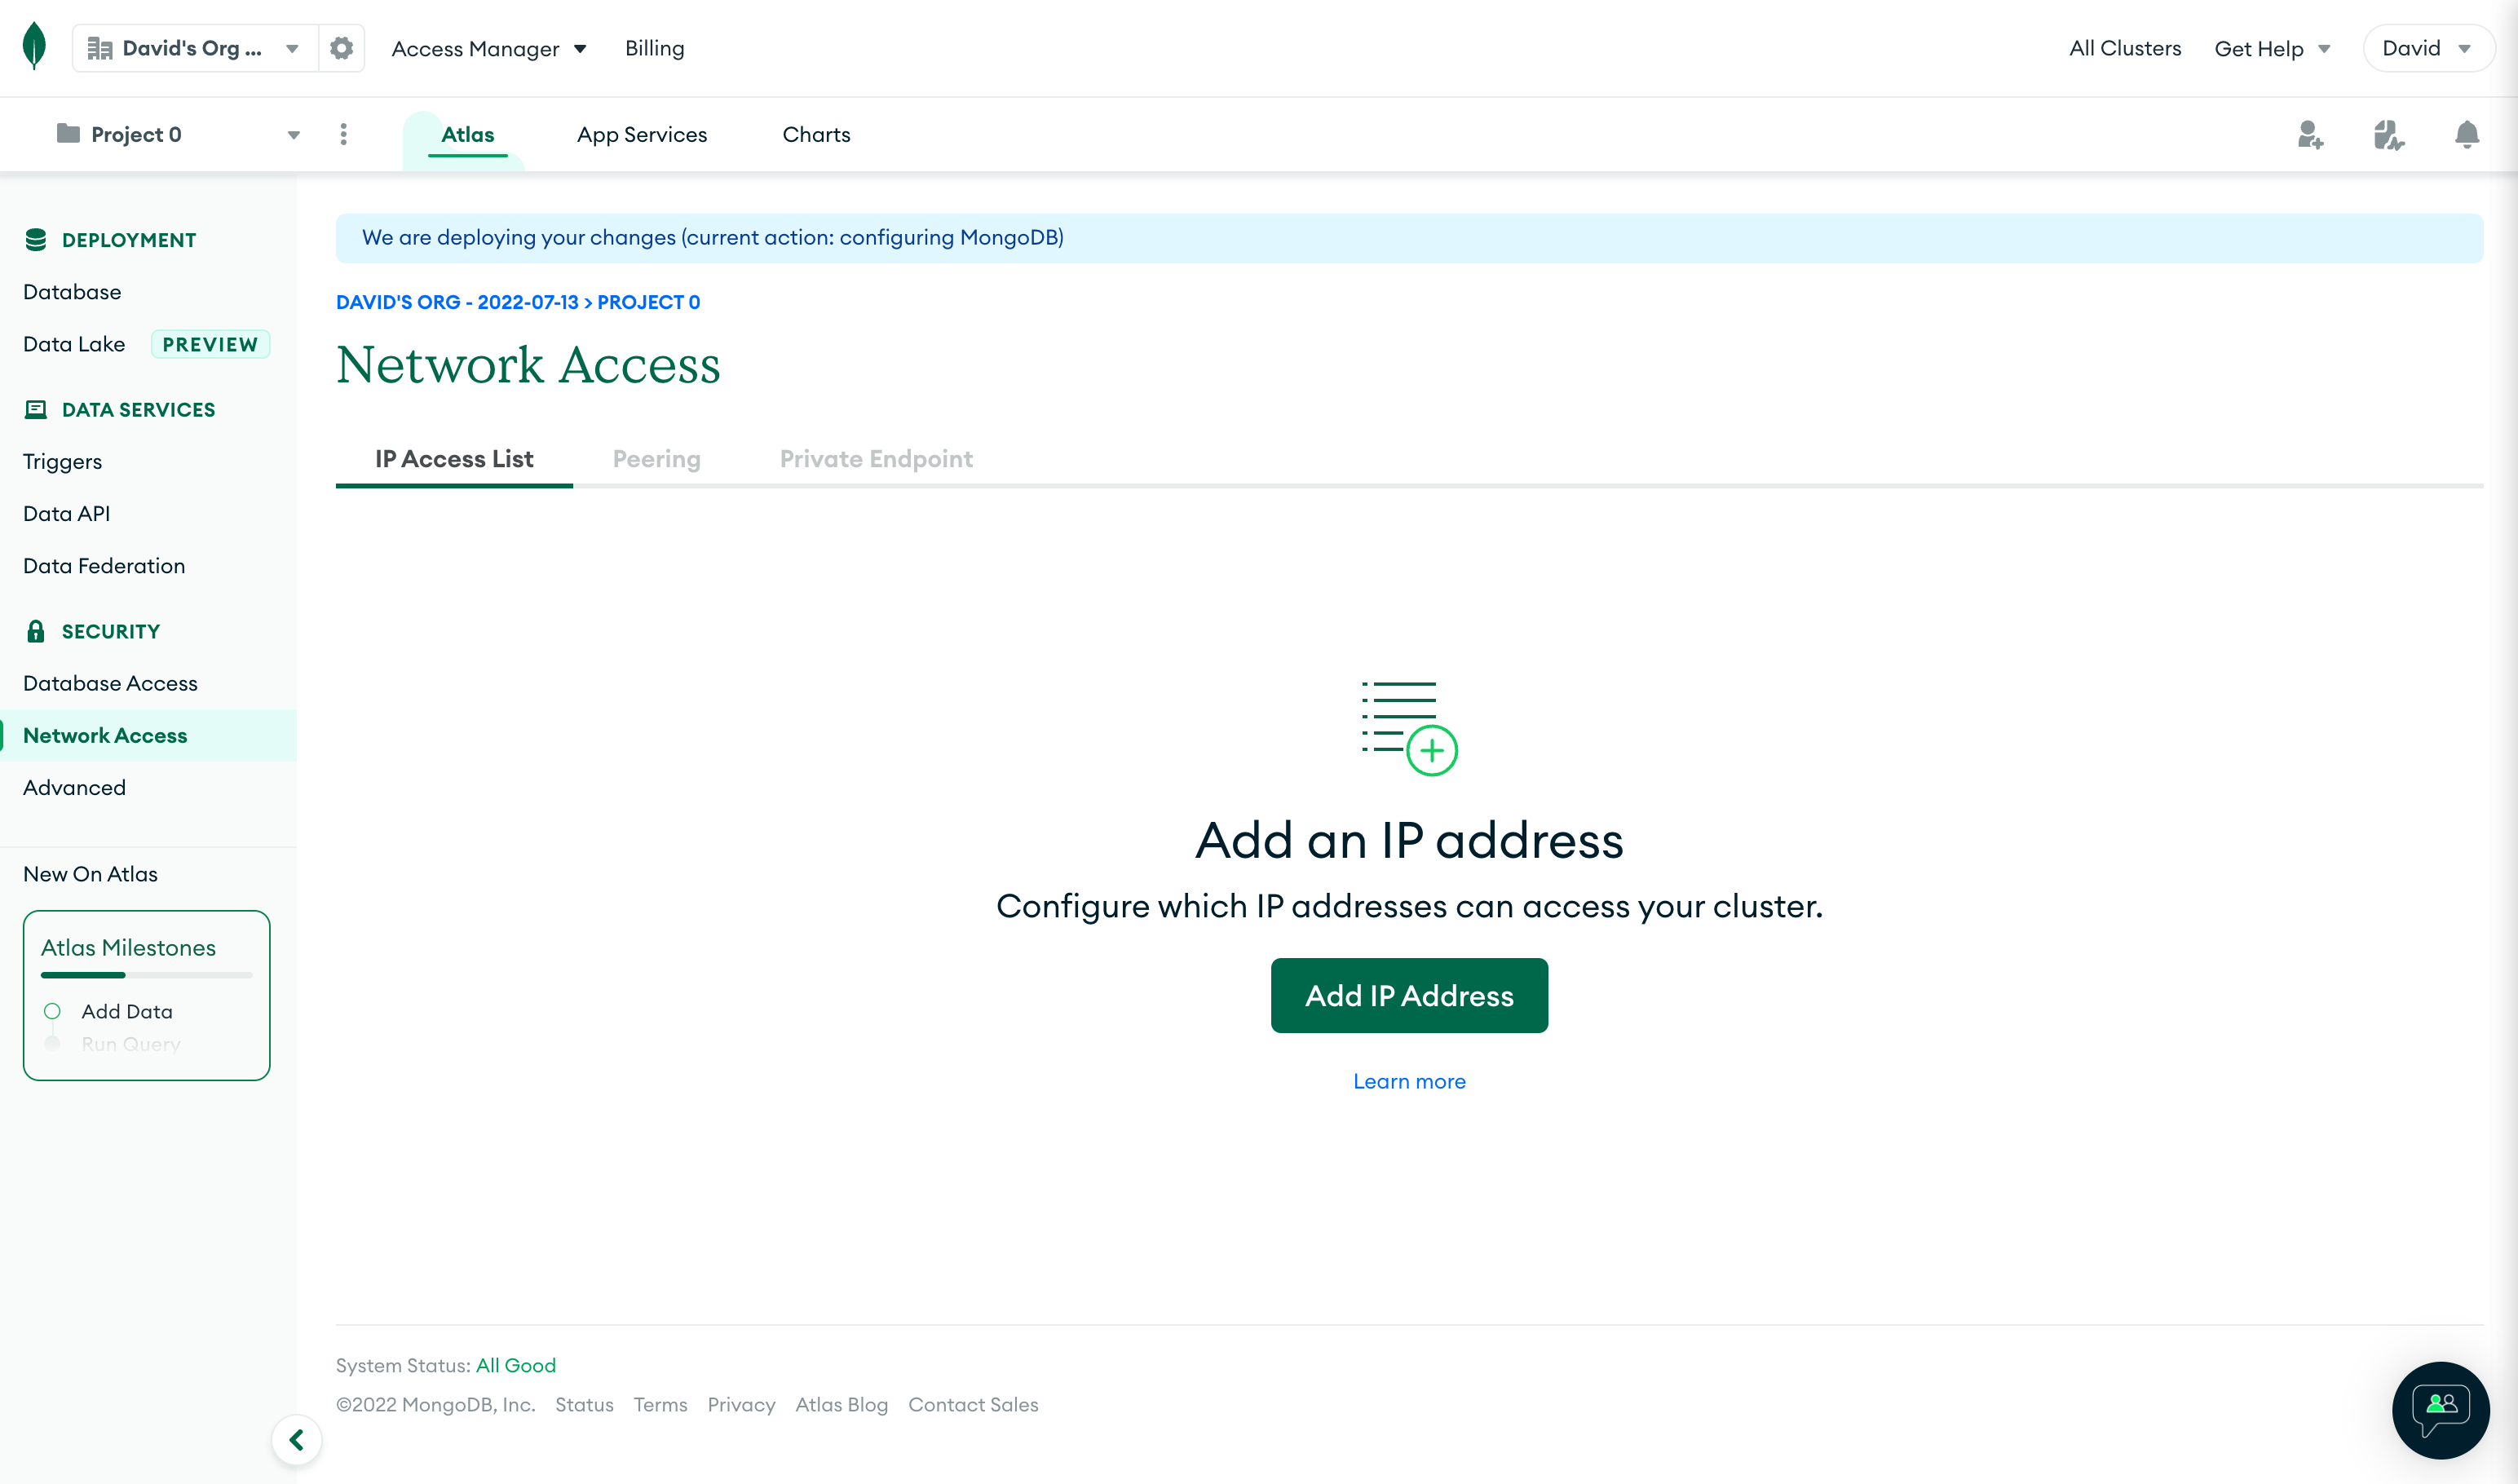
Step 11: Configure MongoDB Atlas Network Access
MongoDB Atlas uses an IP Access List to restrict access to your database to a specific list of source IP addresses. In your application, traffic from your containers originates from the public IP addresses of the NAT Gateways in your application’s network. You must configure MongoDB Atlas to allow traffic from these IP addresses.
To get the IP address of the NAT Gateways, run the following AWS CLI command:
aws ec2 describe-nat-gateways --filter "Name=tag-key, Values=copilot-application" --query 'NatGateways[?State == `available`].NatGatewayAddresses[].PublicIp' --output table
Output:
---------------------
|DescribeNatGateways|
+-------------------+
|  1.1.1.1          |
|  2.2.2.2          |
+-------------------+
Use the IP addresses to create a Network Access rule in your MongoDB Atlas account for each address.
Step 12: Use your API
To get the endpoint for your API, use the following AWS CLI command:
aws apigatewayv2 get-apis --query 'Items[?Name==`api.dev.todo.api`].ApiEndpoint' --output table
Output:
------------------------------------------------------------
|                          GetApis                         |
+----------------------------------------------------------+
|  https://[your-api-endpoint]                             |
+----------------------------------------------------------+
Use cURL or a tool such as Postman to interact with your API:
Add a To Do List item
curl --request POST 'https://[your-api-endpoint]/item' --header 'Content-Type: application/json' --data-raw '{"name": "my todo item"}'
Retrieve To Do List items
curl https://[your-api-endpoint]/items
Cleanup
When finished with your application, use Copilot to delete it. This deletes all the services created in your AWS account.
copilot app delete --name todo